Apple crumble cake

Fall is, hopefully, just around the corner! It’s my favorite season: not too cold outside but just cool enough to wear warm cozy clothes, the air feels fresher and the tree leaves change color into a beautiful fiery red. And, most importantly, we can finally go outside and have fun without feeling like we are melting from under the scorching sun. You might have guessed that summer is probably not my favorite time of the year. The heat is too extreme and the sun is way too strong!

I digress. With fall comes apples. Because I hate apple sauce and don’t particularly enjoy most apple pies or apple turnovers, people tend to think that I do not like apples. That is not true. I eat one every day after lunch. It’s crunchy, sweet and tart at the same time. It’s awesome! What I do not enjoy with some apple based dessert is that they take away what makes the apple so great: its crunchiness. I want my apples to still have a bite! Also, there is something with apples that make people go crazy with the cinnamon. Personally, I find the taste of cinnamon to be overwhelming. If you use too much, you will not taste anything else but the cinnamon. Cinnamon is like bananas. If you put too much of it in a recipe, that’s all you’re going to taste afterwards. Then, what’s the point?

But, I digress again… My favorite dessert to bake during fall is the apple crumble cake. That cake is great because you can eat it guilt-free anytime during the day, from breakfast to late-night snack. Like most of my desserts, I prefer to make small individual portions rather than a big one. It’s a question of aesthetics and practicality. Big cakes are only pretty before you cut them. Afterward, they turn into a crumbling mess. Also, they take forever to bake. Smaller, individual portions not only stay pretty but also guaranty that everybody get an equal amount. So no jealousy.

apple cake.jpeg

It took a while to find the perfect recipe for my taste; I had to mix a few recipes together and, after a few trials and error, this one is my favorite so far.

apple cake top.jpeg

Apple crumble cake

Makes 8 rectangular mini cakes or 14 to 16 muffin-size cakes

INGREDIENTS

Crumble

  • 1/3 cup packed brown sugar

  • 1 tbsp granulated sugar

  • 1/8 tsp ground cinnamon

  • 1/4 cup unsalted butter, melted

  • 2/3 cup all-purpose flour

Cake

  • 1/2 cup unsalted butter, softened to room temperature

  • 1/2 cup brown sugar

  • 1/4 cup granulated sugar

  • 2 large eggs, room temperature

  • 1/2 cup plain Greek yogurt (or sour cream) room temperature

  • 2 tsp vanilla extract

  • 1 3/4 cups all-purpose flour

  • 1 tsp baking soda

  • 1 tsp baking powder

  • 1/2 tsp salt

  • 1/4 cup whole milk, room temperature

  • 1/2 cup roasted pecans, chopped

  • 2 green apples, peeled and cubed

  • 1/2 a lemon

DIRECTIONS

  1. Preheat the oven at 350 degrees.

  2. Grease the tin of your choice (mine makes 8 individual 9 x 6 x 3.5 cm rectangular cakes) and coat it with granulated sugar.

  3. Start by making the crumble: in a bowl, combine the sugars, cinnamon and melted butter. Then stir in the flour, using a fork. Mix until all the ingredient are incorporated. The crumble will be dry and thick, and if big chunks are forming, good! They’re the best! Set the bowl aside.

  4. Peel the apples and chop them into cubes. Most recipes will ask you to make sure that all the cubes are the same size. That allows you to make sure that all the apple pieces will bake equally. However, I don’t care for that. I just peel and cut the apples up. If the cubes are not the same size, what you will get is more texture! Some apple pieces will be softer while others will keep their crunch. Drizzle the juice of half a lemon over the apples and mix thoroughly so they don’t turn brown while you prepare the rest of the cake. Set aside.

  5. Using the paddle attachment, beat the butter and both sugars with a stand mixer, at medium-high speed until smooth, 3 to 4 minutes.

  6. Scrape down the sides and add the eggs one at the time. Beat well after each addition.

  7. Add the vanilla extract and yogurt. Beat at medium-high speed until incorporated, 2 minutes.

  8. In a separate bowl, sift together the flour, baking soda, baking powder and salt.

  9. Add the flour and the milk to the mixture in alternative steps, starting with the flour. Mix until just combined.

  10. Gently fold in the apples and the pecans.

  11. Pour the batter into the prepared pan.

  12. Spoon the crumble on top of the batter and slightly press it down into the batter with your hands. This step is important because it prevents the crumble from falling out of the cake while it bakes.

  13. Bake until golden brown, or until a toothpick inserted in the center comes out clean, about 20 minutes.

  14. Remove the pan from the oven and let it cool down. Then, carefully remove the cakes from the pan and transfer them on a wire rack so they cool completely.

Look at that crumble on top! Doesn’t it look delicious? The big chunks are the best!

Look at that crumble on top! Doesn’t it look delicious? The big chunks are the best!

VARIATIONS

If you enjoy the taste of cinnamon, you could add more to the crumble and add a teaspoon into the batter mixture (or more to taste). What you could also do is, in step 2, mix some cinnamon with the granulated sugar and use that mixture to coat the pan!

If you want to add a little something to your cake, caramel sauce or a simple vanilla glaze (confectioners' sugar mixed with cream and vanilla extract) will do the trick. But if you’re tired or feel lazy, go for a generous scoop of good vanilla ice cream!


Enjoy!


The best carrot cake

A good carrot cake is very difficult to come by. Especially if you, like me, don't like cinnamon. I am not a fan of spices in general and never found the need to add them to my desserts. Personally, I find their taste a bit too strong and overwhelming, and that is why I tend to avoid using them when baking. The problem is, most carrot cake recipes require some amount of cinnamon, spices or raisins. Raisins. That's another thing I dislike. So, although I do love a good carrot cake, I seldom find one I actually enjoy or a recipe for one that doesn't require raisins and cinnamon or some other spice.

IMG_4959.JPG

This recipe is my all-time favorite because it requires none of the ingredients I dislike and it tastes wonderful! I rarely make carrot cakes, though, because the amount of dishes I have to wash afterwards is depressing. So, I save this cake for special occasions and make it only once or twice a year. This year, I baked a batch over the Easter break.

IMG_4943.jpg

If you are not a fan of cinnamon, spices and raisins but love carrot cake, this recipe is definitely for you. 

IMG_4962.jpg

The best carrot cake

Makes 24 muffin size cakes

Ingredients

  • 2 1/2 cups flour

  • 1 1/2 tsp baking soda

  • 1 1/4 tsp baking powder

  • 1/2 tsp salt

  • 1 1/2 cups sugar

  • 4 large eggs, room temperature

  • 1 cup vegetable oil

  • 1 tsp vanilla extract

  • 2 cups grated carrots (approx. 4 carrots)

  • 1 cup chopped pecans

  • 1 cup unsweetened shredded coconut

  • 1 8oz can of crushed pineapple (drained)

  • Vanilla frosting

Directions

  1. Preheat oven to 350 degrees.

  2. Line 2 muffin tins with paper liners.

  3. Sift together flour, baking soda, baking powder and salt.

  4. In the bowl of an electric mixer fitted with the paddle attachment, mix sugar, eggs, oil and vanilla at medium speed until light colored and well combined. 3 to 4 minutes.

  5. Slowly add the flour mixture and mix until just blended.

  6. Fold the carrots into the mixture. This step and the next ones are delicate, so hand mix with a spatula.

  7. Fold the pecans into the mixture.

  8. Do the same for the coconut, and then the pineapple.

  9. Fill each liners about 2/3 full with the batter.

  10. Bake for 20 minutes or until a toothpick inserted in the center comes out clean.

  11. Let the cakes rest in the tin for 5 minutes before transferring them to a rack to cool completely.

For me, carrot cake comes with a good layer of frosting. Cream-cheese frosting to be precise. If there are none, I would get seriously upset. If you're looking for a good cream cheese frosting recipe, click here. It also happens to be my go-to vanilla frosting for any type of desserts.

Optional

If you want to impress people, decorate your carrot cakes with little curls of candied carrots. They look fancy but are super easy to make. There seems to be a lot of steps, below, but rest assured that the curls really are easy to make!

  1. Preheat oven to 225 degrees.

  2. Make carrot strips using a vegetable peeler. Only 1 carrot will be needed.

  3. Bring 1 cup of water and 1 cup of sugar to a boil, on high heat, and mix until all the sugar has dissolved.

  4. Add the carrot strips and reduce heat.

  5. Let simmer for about 15 minutes.

  6. Remove from heat an strain out the liquid. Let cool a few minutes.

  7. Put parchment paper on a large baking sheet and spread the carrot strips on a single layer.

  8. Bake for about 20 minutes, but do not turn off the oven.

  9. The strips will be almost dry.

  10. Working very quickly, wrap each carrot strips around a pencil to form curls and gently slide the curls off the pencil.

  11. Put the curls back in the oven and continue baking for about 10-15 minutes, until completely dry.

  12. Let the curls cool completely before decorating the cakes with them.

Variation

If you don't want to make cupcake size cakes and prefer a bigger one, just use 2 9-inch round pans. Line their bottom with parchment paper, and butter the bottom and sides of the pans. Then, bake for about 35 to 40 minutes.

My go-to vanilla frosting

Frosting should not be underestimated. If not done properly, you could ruin a whole cake. For that reason, you should find that one recipe that you really master so you have something to fall back on in case of emergency. For special occasions, I always try to find a new vanilla frosting recipe but generally, I always go back to this one. It's simple and easy to make.

Personally, I am not a fan of buttercream frosting. First, because it requires a lot of temperature control: if the butter or the room you're baking in is too cold, the cream will be too thick but if it's too hot, the cream will be curdled. Very frustrating. And the second reason why I don't like buttercream is that it requires so much butter and sugar! I mean, 2 sticks of butter and 4 cups of sugar is just too much! 

My favorite recipe only uses 1 cup of sugar and is made with cream cheese and whipping cream. Not only is cream cheese my favorite spread for my morning toasts, it is also perfect for frosting because it ads a bit of tanginess, thus providing some balance taste-wise for the cakes. The dessert will not be over sweet and the whip cream makes the frosting super light.

Vanilla frosting.JPG

My go-to vanilla frosting

INGREDIENTS

  • 1 pkg (8 oz) cream cheese, room temperature
  • 1 cup powdered sugar
  • 1 1/2 cups cold heavy whipping cream
  • 1/2 tsp vanilla extract
  • 1/2 tsp vanilla paste (optional)

DIRECTIONS

  1. Using a stand mixer with the whisk attachment, whip the heavy cream on high speed, until thick and fluffy. About 2 minutes. Be careful not to over whip! The cream should not be so thick that it looks like butter.
  2. Transfer the cream into another bowl and store it in the refrigerator.
  3. Now back to the stand mixer, whip the cream cheese and slowly add the powdered sugar, one 1/4 cup at a time. Beat at low speed. Once all the sugar is incorporated, increase speed to medium-high.
  4. Add the vanilla extract and mix. I also like to add a little bit of vanilla paste for a fuller taste and also because the tiny little vanilla seeds make the frosting look so much better! 
  5. Then, fold the whipped cream into the cream cheese mixture. This step is delicate so it should be done by hand, with a spatula.
  6. And that's it! Your frosting is ready to be piped or stored until ready to be used.

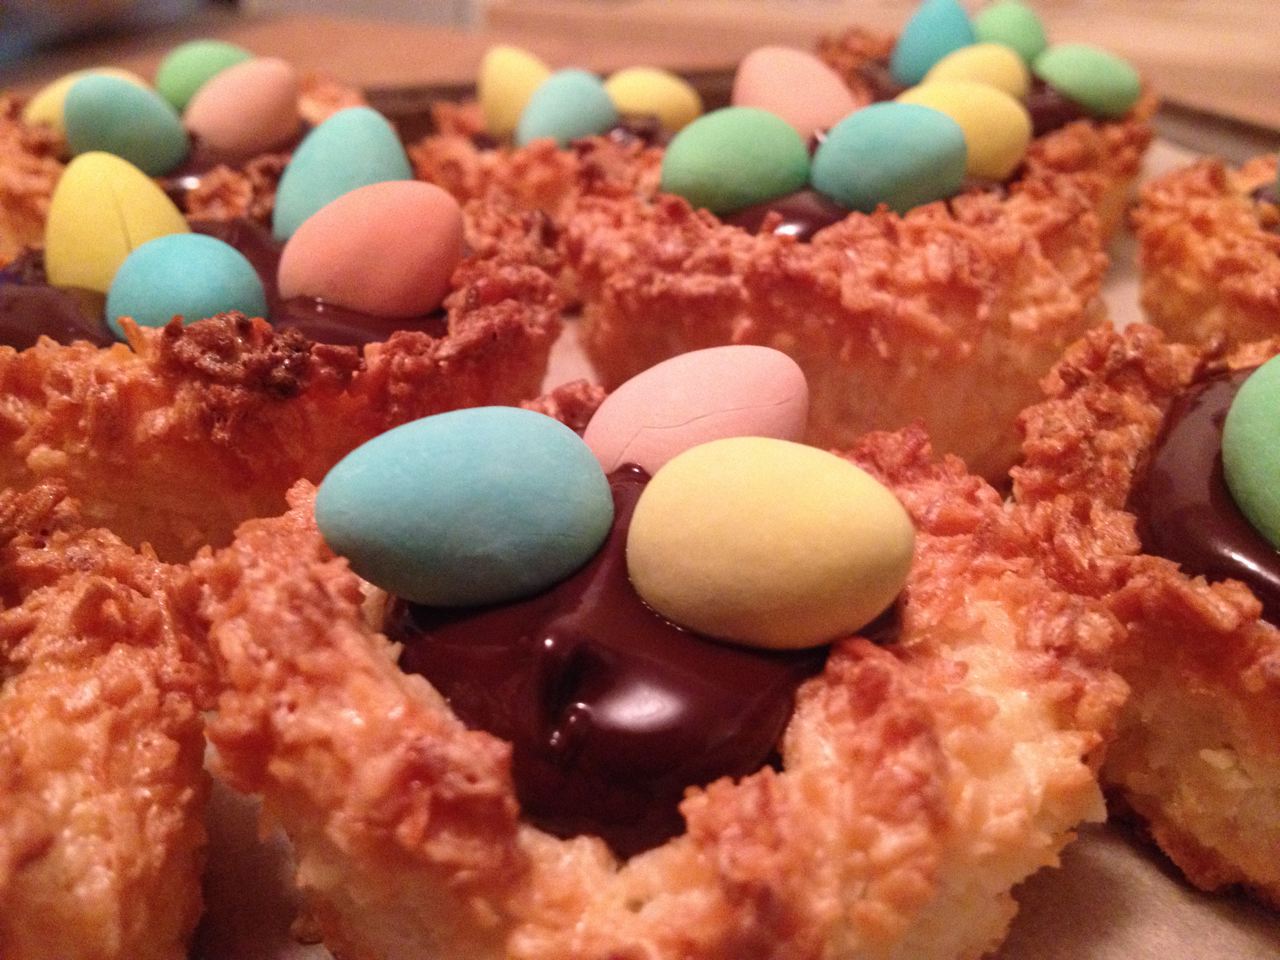
Coconut macaroon nests

This is probably the easiest and most fun dessert to make! And, it only requires very few ingredients, so how great is that? 

IMG_5423.JPG

These coconut macaroon nests can be made all year round but I like to make them around Easter so I can use those tiny Cadbury chocolate eggs as decorations! The nests are perfect for family gatherings and/ or activities. Grownups and kids alike just love preparing them as much as they enjoy eating them! 

The macaroon nests are crunchy with a chewy center, and the coconut pairs perfectly with the chocolate ganache in the middle. Coconut and chocolate are among the best food pairings there are! Alone they are great but together? They are just awesome! 

IMG_4157.JPG

Coconut macaroon nests

Makes 12 nests

INGREDIENTS

Crust

  • 2 cups of shredded unsweetened coconut
  • 3 large egg whites
  • 1/4 cup sugar
  • 1 tsp vanilla extract
  • 1/4 tsp salt

Ganache

  • 3/4 cup semisweet chocolate, chopped
  • 1/2 cup of heavy cream
  • 1/8 tsp salt

Optional

  • Mini Cadbury chocolate eggs

Directions

  1. Preheat oven to 325 degrees.
  2. Line a muffin tin with paper liners or grease the muffin tin cups.
  3. In the bowl of an electric mixer, whisk together egg whites, sugar, vanilla and salt until the mixture is frothy or foamy, 2 minutes.
  4. Add the coconut to the egg white mixture and mix until the coconut is evenly moistened. 
  5. Drop 2 tbsp of the mixture into each prepared liners or into each muffin tin cups.
  6. Delicately press the mixture down and up the sides of each cups, so it looks like a nest.
  7. Bake until golden brown, about 20 to 25 minutes.
  8. Let the coconut nests cool in the tin for about 5 minutes before transferring them to a wire rack to cool completely.
  9. While the nests are cooling, prepare the ganache.
  10. In a microwave safe bowl, add the semisweet chocolate and the cream and heat for 1 minute. 
  11. Whisk together until completely combined.
  12. Add the salt and whisk.
  13. If there a still a few chunks of chocolate left, heat for 30 seconds. Then, whisk some more until smooth.
  14. Once the nests are completely cool, fill each of them with the ganache. 
  15. Decorate each coconut nest with a few chocolate eggs.

And voilà! The cutest little coconut nests ever! 

Variations

Instead of the ganache, you can also save time and use Nutella but personally, I find Nutella a bit too sweet. If you are not a fan of the chocolate ganache, you can just serve the coconut nests with only the chocolate eggs inside. Or, replace the ganache with jam!

Enjoy and have a very happy Easter!

IMG_4158.JPG

The ultimate poundcake

Poundcakes are considerably underrated and underappreciated. They are plain enough that you can eat them at any moment of the day without being judged (yes, that means breakfast too!) and, dressed up with some berries, English cream or a coulis of some sort, they can very easily be elegant enough to impress dinner guests. Poundcakes are my go-to dessert to make when I feel like eating something sweet but do not want spend too much time or effort whipping something up. They are easy to make and amazing to eat: dense but moist, sweet but not overwhelmingly so and you can make countless variations from one single recipe just by adding stuff!

IMG_4521.JPG

I have tried and tested a great deal of recipes and found that the one bellow is what works best for me. It is pretty much an adaptation of several recipes mashed into one. I am a huge almond fan, so I usually love adding almond flavors to a lot of my desserts. But, for my poundcake, I decided to splurge a little and used almond paste instead of almond extract. Personally, I find that the almond paste gives the cake an amazing depth of flavor but some people might find it a bit overwhelming. If you are not as big an almond fan as I am, you might want to replace the almond paste with half a teaspoon of almond extract. Or, you could just do the recipe without the almond paste, in which case, use a bit more vanilla. 

IMG_4511.jpg

The Ultimate Poundcake

Makes one 5x9x3 inch cake or 12 to 14 cupcake size cakes

INGREDIENTS

  • 7 ounces of almond paste, grated

  •  1 cup granulated white sugar plus 3 tbsp, divided

  • 1/2 cup butter, room temperature, plus 1 tbsp melted

  • 4 large eggs, room temperature

  • 1 tbsp lemon zest (approx. 1 lemon)

  • 1 tsp vanilla extract

  • 1/2 cup sour cream

  • 1 1/2 cups all purpose flour

  • 1 tsp baking powder

  • 1/2 tsp salt

DIRECTIONS

  1. Preheat the oven to 325 degrees.

  2. Grease the inside of a 5x9x3 inch loaf pan with 2 tbsp of butter. I like to line my pan with a sheet of parchment paper (9 inch long and 7 to 8 inch wide, so it sticks out on both sides of the pan). It just makes it easier to pull the cake out of the pan, when it's done. If using a parchment paper, butter the inside of the paper as well. Most recipes will tell you to flour the inside of the pan, but here's a little trick: coat the pan with granulated sugar instead. Approximately 3 tbsp of it. As the cake bakes, the sugar will caramelize, adding a nice little crunch to it. 

  3. Beat the almond paste with a stand mixer, at low speed, using the paddle attachment. Slowly add the sugar, 1/4 cup at a time. Continue beating at medium-low speed until incorporated, 3 to 4 minutes.

  4. Add the butter and beat on high speed until smooth, 5 to 6 minutes.

  5. Add the eggs one at a time, beating well after each addition.

  6. Add the zest, vanilla extract and sour cream. Beat until incorporated, 2 minutes.

  7. In a separate bowl, sift together the flour, baking powder and salt.

  8. Slowly add the four mixture to the almond paste mixture, beating at medium speed, just until combined (do not overmix the batter).

  9. Pour the batter into the prepared pan and bake until golden brown, or until a toothpick inserted in the center comes out clean, 50 minutes up to an hour.

  10. Remove the cake from the oven and let it cool down. Then, carefully remove the from the pan and put it on a wire rack so it cools completely.


VARIATIONS

If you are like me and do not like to wait an hour for the cake to bake, and if you also despise cutting a cake (no 2 slices are ever the same size and cutting creates crumbs everywhere!), you could pour the batter into a cupcake pan. That way, baking only takes 20 minutes and every portions is the same size! With this recipe, you could have 12 to 14 cupcake sized poundcakes.

Poundcake.jpg

I find that this poundcake doesn't need anything else to taste good. But, if you want, you could pour a glaze on top of it once it has cooled. Since there are lemon zests in the cake, use lemon juice for the glaze. Mix 3 tsp of freshly squeezed lemon juice with 1/3 cup of powdered sugar. Add more sugar if you prefer a thicker glaze. Slowly pour the glaze all over the cake. 

Instead of a glaze, you could also make a coulis. Raspberry is a personal favorite but any fruit would do. Even better: don't prepare a coulis and just decorate the cake with fruits!

From this recipe, you could pretty much make any type of poundcake you want. Just add ingredients! You like coconut? Just add a cup of shredded coconut! You prefer chocolate chips? Great! Add as many chocolate chips as you like! The possibilities could pretty much go on and on!


Mini cheesecakes with raspberry swirls

I never get tired of eating cheesecakes. They're the best. Smooth, tart, moist and rich at the same time. Pair them with any type of fruit, coulis or sauce and you've a whole new dessert each time! My favorite cheesecake recipe is an adaptation of Martha Stewart's Easter cheesecake. That cake was a revelation, and for two reasons: no Graham crackers (not a fan of those) and the lemon zest! Ground almonds replace the crackers, providing the cakes with a lighter and subtler taste, and the zests add a little more freshness to the experience. 

I never liked making full-size cakes because I find cutting them ruins the whole look of the dessert and I am way too impatient to wait for the cake to bake. It sometimes takes up to an hour! Cupcake-size cakes take much less time to bake and each serving is pretty! It's a win-win situation in my opinion.

Cheesecake.jpg

Mini cheesecakes with raspberry swirls

Makes approx. 20 mini cakes

Ingredients

Crust

  • 1 cup ground blanched almonds

Filling

  • 4 250g cream cheese packages, room temperature

  • 1 cup sugar

  • 1 tbsp lemon zest (approx. 1 lemon)

  • 1/2 cup heavy cream

  • 1 tsp vanilla extract

  • 4 large eggs

Raspberry sauce

  • 8 oz fresh or frozen raspberries

  • 4 tbsp granulated sugar

Directions

  1. Preheat the oven to 325 degrees.

  2. Line muffin tin with paper liners and pour 1 tablespoon ground almonds in each liner. Spread evenly.

  3. Add raspberries and 4 tablespoons of sugar in a food processor and pulse until well puréed, about 1 minute.

  4. Press the mixture through a fine mesh strainer. Set aside.

  5. In the bowl of an electric mixer fitted with the paddle attachment, beat on medium low speed the cream cheese, heavy cream and sugar until smooth, about 2 minutes.

  6. Add eggs one at a time and beat until incorporated.

  7. Add zest and vanilla and beat until incorporated.

  8. Fill each prepared liner about 2/3 full with the batter.

  9. Drop about 5 small dots of raspberry sauce over each cake (about 3/4 tsp total over each cake).

  10. Using a toothpick, swirl raspberry sauce with cheesecake mixture. Don't over do it; a few quick swirls will do the trick.

  11. Bake for about 18 to 20 minutes or until the center of the cheesecakes don't jiggle when the pan is tapped.

  12. Remove from the oven and set on a rack to cool completely, then chill in the refrigerator for about 3 hours until set.

  13. If you have leftover raspberry sauce, don't throw it away! Save it in a sealed container so that you can serve it later with the cheesecakes.

 Variations

Not a fan of the ground almond crust or allergic to nuts? Not a problems! Just use the traditional graham cracker crust instead (1.5 cups of graham cracker crumbs mixed with 1/3 cup of sugar and 6 tbsp melted butter. Optional: 1/8 tsp cinnamon). I looked for alternatives because I never was a fan of graham crackers, but I do understand its appeal.

If you're looking for something different, replace the crust with Oreo cookie wafers! They add a chocolaty taste to the cakes!

If you're not a raspberry fan, do not make the swirls and bake the cakes as is. The cakes are good as they are and can be enjoyed as such. You can also pair them with any type of sauce (chocolate, caramel, condensed milk, ...), any type of coulis (strawberry, blueberry, passion fruit, ...) or any fruit of your choice! The possibilities are endless and you cannot go wrong, no matter what you go for!