Easy brownies

Brownies are uncontestedly the best comfort food out there. And for that reason, they should not require much time not effort to prepare, because the comfort is needed NOW!

I have tried and tested numerous recipes over the years, and to be frank, almost most of them are great. This one is still my favorite because it requires only one egg, not much flour and can quickly be made in one bowl before being sent in the oven. If you like chewy and crunchy brownies, this recipe is for you.

IMG_1025.jpg

Easy brownies

Makes 16 2” squares

ingredients

  • 1/2 cup butter, melted

  • 3/4 to 1 cup packed brown sugar (the quantity depends on how much of a sweet tooth you are)

  • 1/4 tsp salt

  • 1 egg

  • 2 tsp vanilla extract

  • 1/4 tsp almond extract (optional)

  • 3/4 cup flour

  • 1/3 cup unsweetened cocoa powder

  • 1/2 cup dark chocolate chunks

  • 1/2 cup chopped pecans


directions

  1. Preheat oven at 350.

  2. Line a 8” x 8” baking pan with parchment paper.

  3. In a bowl, mix butter, brown sugar and salt until combined.

  4. Add the egg, vanilla and almond extracts. Mix well.

  5. Sift in the flour and cocoa powder. Stir until incorporated. If not using an electric mixer, use a spatula for this step, it’ll be easier to mix.

  6. Fold in the chocolate chunks and pecan.

  7. Pour batter in the pan, spread it evenly into an even layer.

  8. Bake for 18 minutes.

Let cool a bit on a rack, slice and enjoy!

The cake should be soft and chewy. I prefer by far chocolate chunks to chips because they add some crunch to the dessert but you don’t have any or prefer melted chocolate, use chips. I also use dark chocolate but semi sweet will also do but personally, I find them too sweet. The pecans are there for more crunch and to add some nutty flavor as well.

IMG_1034.jpg

The resulting brownies are a bit thin but I like that!

It took less than half an hour from beginning to end, to make these brownies, and that’s perfect.

Enjoy!

Chocolate / black sesame cookies

I can’t really explain it but I am currently obsessed with black sesame seeds right now. I love the color, the taste, the texture, and all I want to do is make desserts with them. I decided to start off easy and bake cookies. I always thought that something was missing from chocolate chip cookies but I never really could pinpoint what exactly. I crave chocolate chip cookies but always end up disappointed, expecting something more. Who knows, maybe the nutty, slightly bitter taste of the black sesame seed is the missing link. Over the week-end, I decided to find out once and for all.

This recipe below is my first attempt at combining black sesame with chocolate cookies. I found it quite satisfying and the people I shared the cookies with really seemed to enjoy them. The cookies in themselves are not very pretty but they are tender and chewy, just how I like them, and the chocolate chunks bring a much welcome crunch to each bite!

IMG_7601.jpg

Chocolate / black sesame seed cookies

Makes approx. 24 cookies

ingredients

  • 1 2/3 cups flour

  • 1/3 cup dutch-processed cocoa powder

  • 1/3 cup finely ground black sesame seeds

  • 3/4 tsp baking powder

  • 1/4 tsp baking soda

  • 1/2 tsp salt

  • 1/2 cup (1 stick) butter, room temperature

  • 3/4 cup packed brown sugar

  • 1/3 cup granulated sugar

  • 2 eggs

  • 1/2 tsp vanilla extract

  • 1/8 tsp almond extract

  • 1/2 tsp soy sauce

  • 1/2 cup dark or semisweet chocolate chips

  • 1/2 cup dark or semisweet chocolate chunks

  • black sesame seeds for topping

directions

  1. Preheat oven at 350 and cover cookie sheets with parchment paper.

  2. In a bowl, sift together all the dry ingredients: flour, cocoa powder, ground black sesame seeds, baking powder, baking soda, salt.

  3. In the bowl of an electric mixer fitted with the paddle attachment, mix sugar and butter at medium speed, until light and fluffy, 2 minutes.

  4. Add eggs, vanilla extract, almond extract and soy sauce. Mix until incorporated.

  5. Add the flour mixture and mix at medium-low speed, until incorporated. Scrape down the sides of the bowl occasionally.

  6. Fold in the chocolate chips and chunks with a spatula.

  7. With a 1.5 tbsp cookie scoop, or a medium cookie scoop, scoop out balls of dough of approximately 1 to 1.5 inch in diameter.

  8. Place the dough on the cookie sheet, about 2 inches apart.

  9. Press the balls of dough down a bit, to facilitate the spreading, and sprinkle some sesame seeds on top.

  10. Bake for approximately 12 minutes.

  11. Leave the cookies on their cookie sheet for a few minutes before transferring them to a cooling rack.

And that’s it! I did find the cookies very enjoyable but I still feel like the sesame flavor did not shine enough. In the future, I’ll tweak the recipe a bit, and I might try using black sesame paste instead of simply powder. I’ll also have to find a way to make the cookies look a little prettier because these look like weird little sesame paddies instead of cookies. I don’t know what happened!

They taste good, though! If you’re into dry crunchy cookies, look elsewhere because I am all about chewy ones! Though they don’t look the part, these are very tender, with a good bite. I also love combining chocolate chips with chocolate chunks for some texture. Chunks in chewy cookies are simply the best!

Enjoy!

IMG_7595.jpg


Easy and versatile chocolate cake

Chocolate cake is the ultimate comfort food, next to ice cream. Feeling down? There’s nothing better to drown your sorrows in than one of those two desserts. Even better, eat a chocolate cake with a scoop of ice cream on top! But I digress.

I have 2 chocolate cake recipes in my arsenal and they are both awesome and super easy to prepare, which is perfect because they allow me to rapidly whip up a dessert in no time, in case of emergency (surprise guests, a birthday I forgot about, or simply because I want to eat something chocolaty). The first recipe is Ina Garten’s Beatty chocolate cake, and like all of Ina Garten’s recipes, it’s strait forward, no-fail and fabulous! My other recipe is coconut milk-based. Though I adore Ina Garten’s chocolate cake, the coconut milk recipe is the one I go back to the most. It depends on what you feel like. If you prefer fluffy and moist chocolate cakes, go for Beatty’s. If you crave something a bit more dense, go for that coconut milk cake. Since I have a preference for denser cakes, I tend to lean towards the second recipe. It’s also very versatile so it allows me to make lots of variations of chocolaty desserts.

IMG_4832-cropped.jpg

Easy and versatile chocolate cake

Makes approx. 12-16 muffin-size cakes or lots of mini cakes

ingredients

  • 2 oz dark or semi sweet chocolate, finely chopped

  • 3/4 cup unsweetened cocoa powder

  • 3/4 cup boiling water

  • 6 tbsp butter, melted

  • 3/4 cup sugar

  • 2 eggs

  • 1 cup coconut milk

  • 1 1/4 cups all-purpose flour

  • 1 tsp baking soda

  • 1/2 tsp baking powder

  • 1/2 tsp salt

  • 1/4 tsp almond extract

  • Optional: 1/2 cup unsweetened coconut flakes, chocolate chips and/or nuts

directions

  1. Preheat oven to 350 degrees.

  2. Butter muffin pan or line with paper liners.

  3. Put chocolate and cocoa powder in a bowl and pour boiling water on top. Let the mixture stand a while, only stirring occasionally. Continue stirring every now and then until the chocolate has melted and the mixture is smooth.

  4. In another bowl, sift together flour, baking soda, baking powder and salt.

  5. In the bowl of an electric mixer with the paddle attachment on, beat butter and sugar until combined, about 2-3 minutes.

  6. Add eggs one at a time, mixing well after each addition.

  7. Add chocolate mixture and mix well, about 2 minutes.

  8. Add the flour and the coconut milk to the mixture in alternative steps, starting and ending with the flour. Mix until just combined.

  9. If you want to add coconut flakes, chocolates chips and/or nuts, fold them in.

  10. Pour batter into prepared pan.

  11. Bake for approximately 18-20 minutes, or until a toothpick inserted in the center comes out clean.

  12. Remove the pan from the oven and let it cool down. Then, carefully remove the cakes from the pan and transfer them on a wire rack so they cool completely.

For the frosting, I almost always opt for chocolate mousse. I have a great recipe that I always use and you can find it here. I find the airy dark chocolate mousse pairs very well with the fudgy and coconutty chocolate cake.

Variations

This chocolate cake is the base for a lot of my other chocolaty desserts: I use it for muffins, loaf cakes and more! It’s so versatile, that you get a whole different dessert with one or two minor changes! How awesome is that?

Chocolate banana bran muffin: I used the coconut milk chocolate cake recipe, added nuts, ripe bananas, 1 cup of rolled oats. Dusted sugar on top of the mixture before putting it in the oven, for a caramelized crunch.

Chocolate banana bran muffin: I used the coconut milk chocolate cake recipe, added nuts, ripe bananas, 1 cup of rolled oats. Dusted sugar on top of the mixture before putting it in the oven, for a caramelized crunch.

Chocolate loaf cake: basically the above recipe but baked in a loaf pan, with chocolate chips inside and on top.

Chocolate loaf cake: basically the above recipe but baked in a loaf pan, with chocolate chips inside and on top.

The “Bounty” cake: the above recipe but with a coconut macaroon center, just like the chocolate bar. Simple chocolate glaze on top to make it more decadent!

The “Bounty” cake: the above recipe but with a coconut macaroon center, just like the chocolate bar. Simple chocolate glaze on top to make it more decadent!

I sometimes like to put vanilla frosting on my chocolate cake. My favorite vanilla frosting recipe is made with cream cheese and I find its tartness fits extremely well with the chocolate flavor.

IMG_1393.JPG

You can simply add ingredients to the chocolate cake mixture and you can get a whole different dessert. So mix it up and have fun!

Enjoy!

My go-to chocolate frosting that's actually chocolate mousse

I tried to find a good alternative to buttercream frosting. For vanilla cakes, I have a fantastic cream cheese frosting that I can always depend on because it’s pretty much foolproof. But for chocolate cakes, I searched long and hard to find a great yet easy frosting recipe that is not buttercream or even worse, meringue buttercream. Don’t get me wrong, buttercream or meringue buttercream taste amazing and are a dream to pipe. That being said, they are way too sweet for my taste and my kitchen’s room temperature is just too unstable for a proper result. You see, if the room is too cold, the butter will harden and there will be no cream in your buttercream; just sweet, thick butter. If it’s too hot, the butter will melt too fast and the buttercream will curdle. My kitchen constantly fluctuates between too hot and too cold, which means that I always have to MacGyver my buttercream. When the kitchen’s too cold, I have to mix with a hair dryer aimed directly at the bowl. When it’s too hot, I have to mix, refrigerate, and mix again. Meringue buttercream requires a candy thermometer and I just refuse to go there. Candy thermometer requires a level of attention and precision that I’m just not willing to provide.

Then one day it dawned on me that frosting can be what ever we choose it to be. I have a great chocolate mousse recipe so why not use it as frosting? From that day on, whenever I make a chocolate cake, I use chocolate mousse as my go-to frosting. So far, it’s been a huge hit! And why shouldn’t it be? It’s chocolaty, light, not too sweet, airy yet thick enough to be very easily piped. Oh, and did I mention how easy it is to prepare this mousse frosting?

IMG_4830.JPG

My go-to chocolate frosting that’s actually chocolate mousse


ingredients

  • 1 1/2 cups heavy whipping cream

  • 4 large eggs, room temperature

  • 2 tbsp powdered sugar

  • 12 oz good dark chocolate

  • 1/4 unsalted butter, cubed

directions

  1. Whip the cream until firm and forms peaks. Set aside in the refrigerator.

  2. Whip eggs and sugar at medium/high speed until fluffy and thick, about 10 minutes.

  3. Melt the chocolate in the microwave (heat 30 seconds at a time, mix and heat again, to prevent the chocolate from burning).

  4. Mix butter in the chocolate until it’s all melted and the mixture is smooth.

  5. Add the chocolate mixture to the egg mixture and stir the whole thing by hand with a rubber spatula until fully incorporated.

  6. Fold in the chilled whipped cream. Continue folding until fully incorporated.

  7. Pipe on cake.

And voilà! How easy was that? Needless to say that for a better chocolate mousse, you must use the best possible chocolate. That being said, I regularly use the dark chocolate bars from the baking section of my supermarket and the result was just as great.

Enjoy!

Coconut macaroon nests

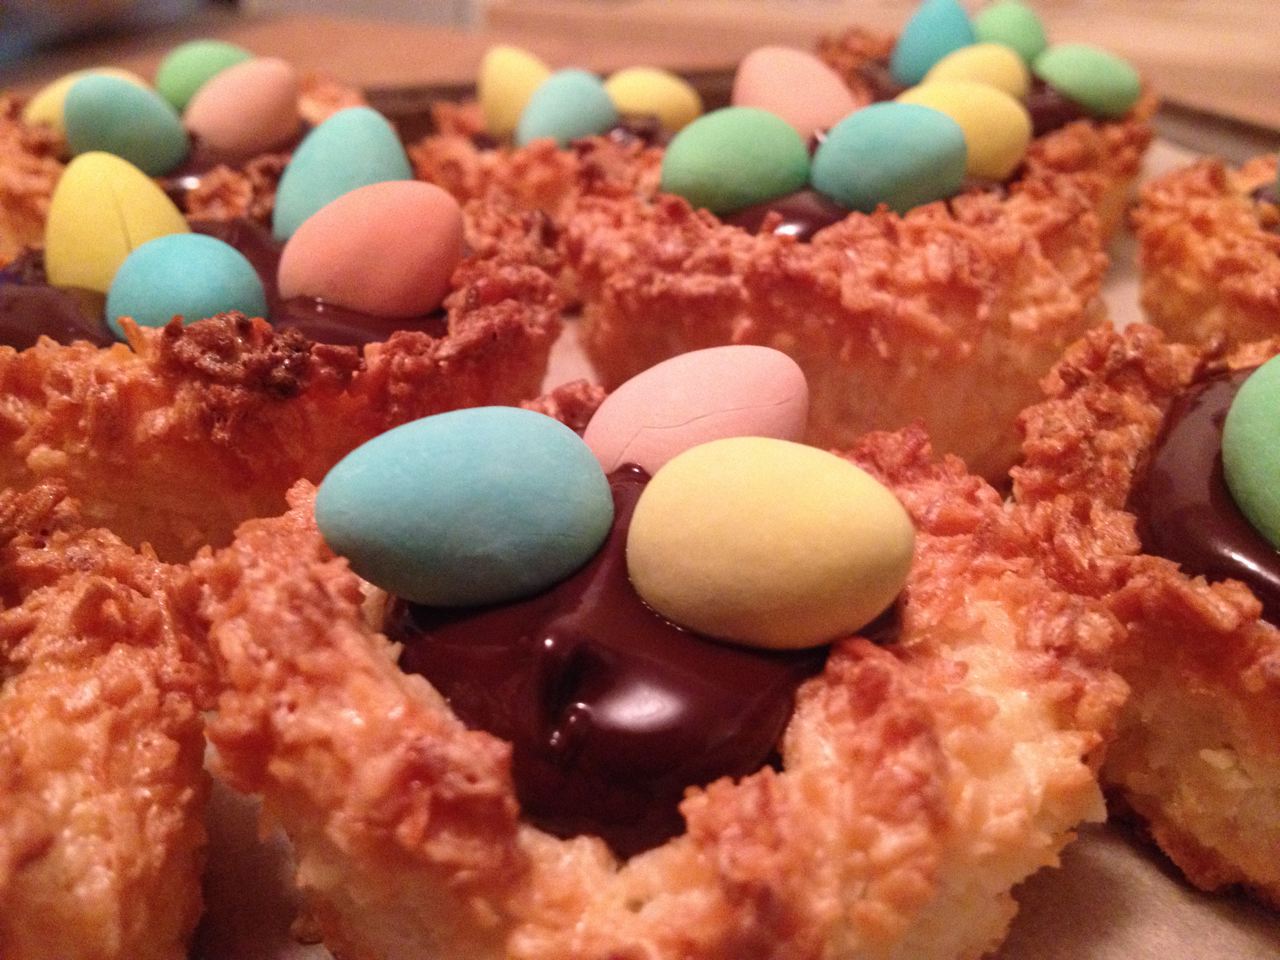
This is probably the easiest and most fun dessert to make! And, it only requires very few ingredients, so how great is that? 

IMG_5423.JPG

These coconut macaroon nests can be made all year round but I like to make them around Easter so I can use those tiny Cadbury chocolate eggs as decorations! The nests are perfect for family gatherings and/ or activities. Grownups and kids alike just love preparing them as much as they enjoy eating them! 

The macaroon nests are crunchy with a chewy center, and the coconut pairs perfectly with the chocolate ganache in the middle. Coconut and chocolate are among the best food pairings there are! Alone they are great but together? They are just awesome! 

IMG_4157.JPG

Coconut macaroon nests

Makes 12 nests

INGREDIENTS

Crust

  • 2 cups of shredded unsweetened coconut
  • 3 large egg whites
  • 1/4 cup sugar
  • 1 tsp vanilla extract
  • 1/4 tsp salt

Ganache

  • 3/4 cup semisweet chocolate, chopped
  • 1/2 cup of heavy cream
  • 1/8 tsp salt

Optional

  • Mini Cadbury chocolate eggs

Directions

  1. Preheat oven to 325 degrees.
  2. Line a muffin tin with paper liners or grease the muffin tin cups.
  3. In the bowl of an electric mixer, whisk together egg whites, sugar, vanilla and salt until the mixture is frothy or foamy, 2 minutes.
  4. Add the coconut to the egg white mixture and mix until the coconut is evenly moistened. 
  5. Drop 2 tbsp of the mixture into each prepared liners or into each muffin tin cups.
  6. Delicately press the mixture down and up the sides of each cups, so it looks like a nest.
  7. Bake until golden brown, about 20 to 25 minutes.
  8. Let the coconut nests cool in the tin for about 5 minutes before transferring them to a wire rack to cool completely.
  9. While the nests are cooling, prepare the ganache.
  10. In a microwave safe bowl, add the semisweet chocolate and the cream and heat for 1 minute. 
  11. Whisk together until completely combined.
  12. Add the salt and whisk.
  13. If there a still a few chunks of chocolate left, heat for 30 seconds. Then, whisk some more until smooth.
  14. Once the nests are completely cool, fill each of them with the ganache. 
  15. Decorate each coconut nest with a few chocolate eggs.

And voilà! The cutest little coconut nests ever! 

Variations

Instead of the ganache, you can also save time and use Nutella but personally, I find Nutella a bit too sweet. If you are not a fan of the chocolate ganache, you can just serve the coconut nests with only the chocolate eggs inside. Or, replace the ganache with jam!

Enjoy and have a very happy Easter!

IMG_4158.JPG